Setting up a GitHub repository for your dev work with ease!

Setting up a GitHub repository for your dev work with ease!
Recently I’ve started to set up repositories for every new project I do, why I’ve started to do this, well simple, all of my dev work for myself and clients are done, using Visual Studio, on my dev pc, all code is on it and only there.
I started to think about what if my PC breaks or if I get a new dev PC, how do I transfer all my work over to that easily?
After a bit of Googling, I came up with a solution that fitted my needs…. GitHub!
You might have a different problem, but the solution is still the same.
In the past I always found that GitHub was hard to use and understand GitHub but, to simply create a repository and push changes is extremely easy to when you know how!
Here’s what you are going to need:
- A GitHub account
- Visual Studio (which this tutorial is based on)
- Git (Git is a free and open-source distributed version control system designed to handle everything from small to very large projects with speed and efficiency).
The first thing to do is to create a GitHub account for yourself. Go to GitHub, click that ‘Sign up’ button in the top right of the site and create an account, then sign in. Click here to go to GitHub and create an account.
Once you have an account navigate to https://github.com/new this is where you will be creating your first GitHub repository!
Creating a GitHub Repository
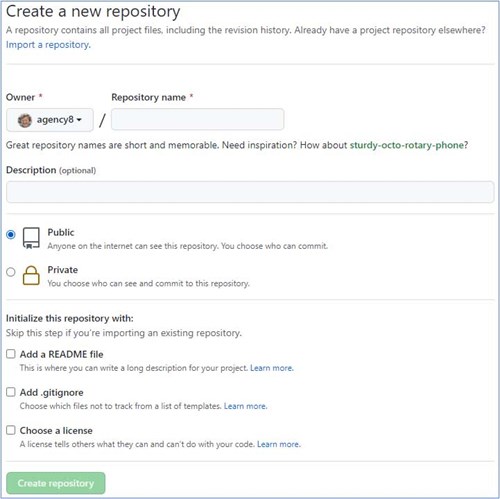
The page to create a new repository will look similar to this:
Let’s start to fill the form out to create your repository.
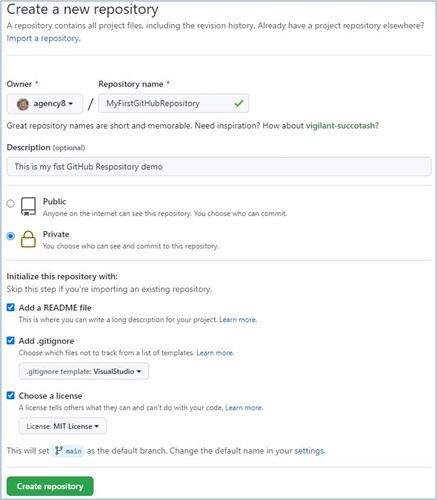
For this demo I’ll be creating a repository called ‘MyFirstGitHubRepository’
Repository Name
At the top you will see the ‘owner’ which should be the name you used when you created the GitHub account. If you have more than 1 account you can use the dropdown to choose where to create your new repository. Next to the ‘Owner’ dropdown you will see ‘Repository name’, choose a name for you repository making should that you choose a good, descriptive name, this is important further down the process of using GitHub for you dev work.
Description
It is always good practice to place a good description of your repository, fill out a good description of your repository to make it easy for you to find the project quickly and easily.
Public or Private
GitHub recently added the ability to have private repositories for free, this used to be only available for paid accounts. This for me is a great addition, because I don’t want to have all my client code available to the public, therefore I always choose the ‘Private’ option. You may want to have the repository open to the public, this is up to you!
Repository options
Check the ‘Add a README file’ This will create a readme file automatically for you with the name of the repository ( you typed in the for section and the description). This can be changed later.
Check the ‘Add .gitignore’ Once you have checked this, a dropdown will appear. Because I user Visual Studio I don’t want the parts of the Visual Studio projects that are not needed. Click the dropdown, in the ‘Filter ignores’ input, type ‘VisualStudio’, the click the ‘VisualStudio’ result.
Check the ‘Choose a license’ From the dropdown that appears, choose what license you want to use. For information about the different types of licenses available, click here.
Once you have filled out what was asked for you should have a screen something like the image below:
Now, just click the ‘Create repository’ button, that’s it, you’ve created your first repository on GitHub!!!
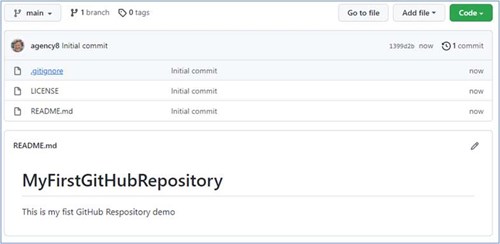
Now that you have your repository created, you should see something similar to this:
The last thing we need to do is to create the Url of the repository to use to clone it. To do this, click the ‘Code’ dropdown, then click the copy button.
That’s it for GitHub at the moment, now lets set up your dev PC so that we can take advantage of your new Repository.
Setting up the repository on your Dev PC
The first thing we need to do is to install ‘Git’. Go to https://git-scm.com and download the latest version of the software for your PC. Follow the instructions and keep the defaults, that should be sufficient.
Using Git to clone your repository
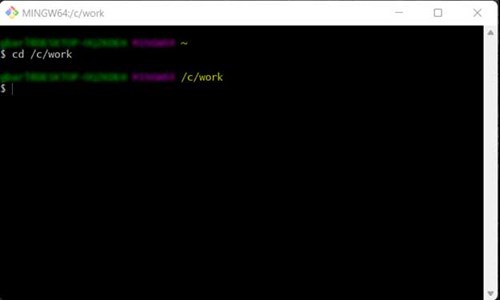
In your file explorer, navigate to the place where you want the repository to be, right mouse click and choose ‘Git Bash Here’ If you don’t see this in the context menu, click the Windows start button and type ‘Git bash’ and you should see the Git Bash command widow open.
Now that we are in the right directory we can clone the GitHub repository we created above.
In the Git Bash command window type: git clone <paste the copied clone url> replacing ‘<paste the copied clone url>’ with the copied url from GitHub, in my case the line should be:
Now hit the enter key on your keyboard and if you loon in the file explorer you should see the directory being created automatically.
That’s it for the Git Bash command windows, we can now close it.
Setting up VisualStudio to use your new repository
Open VisualStudio and choose ‘Create a new project’. In the next window, type in ‘Blank Solution’. Click it to highlight the option and then click the ‘Next’ button.
For the solution name make sure you use exactly the same name as the repository, in my case ‘MyFirstGitHubRepository’ and for the location make sure that you choose the root where the newly created directory was created by Git Bash, in other words NOT IN the created directory. Don’t worry, VisualStudio will just add the files it needs and not overwrite anything.
VisualStudio is now ready to commit changes to the repository!
In VisualStudio, on the right bottom side, click the ‘Git Changes’ tab and it should look like something similar to this:
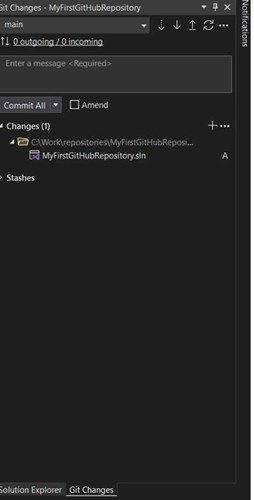
If it doesn’t just close VisualStudio and re-open the new project, you should now see the changes that need to be committed to GitHub.
Click the ‘+’ button to stage the files ready to be committed to your repository. Add a comment/message to let you know what this commit is, usually I would type ‘Initial commit’, then click the arrow on the dropdown that says, ‘Commit All’ and choose ‘Commit All and Sync’. VisualStudio will then commit (transfer) all files that have been changed or added to you GitHub repository!!
If you now look at your repository on GitHub, you should now see the VisualStudio files you created when you create the project! Done.
Now you can add new projects to the blank project you have created for the repository, and files/projects will then be added/staged and committed.
And that’s how easy it is, now all project code is in a safe place (GitHub) and you don’t need to worry about losing code again! A big plus, it can be a private repository that is hidden from the public eye or shared with people how are also working on that project!

Comments